In case you missed it here are Part 1 (Your Neck and Head) and Part 2 (Your Shoulders and Thoracic Vertebrae)
Today’s topic Part 3: (Your Lumbar/Pelvic/Hip Complex) is
the third post dealing with the area that can change the most, our posture.
What changes in our posture during the decades from reaching adulthood until
retirement?
 |
| Posture Changes with Age http://www.bodycare-clinic.co.uk/questions-from-patients-1/ |
I believe that all training should begin by improving a
client’s posture before working on more complex things like mobility and
strength. Bad posture with a lack of mobility and stability can lead to injury.
When I mention posture do you think of your body being
held in a rigid and static position? After reading my blog posts about this, I hope
your picture of posture will change. While it is important to be able to put
your body into a certain position, posture can be thought of as more dynamic
than that.
What causes changes in posture? Whatever position(s) we
spend the most time in has a huge effect on posture. An example is sitting down
watching TV or working on a computer or tablet. Gravity never rest. Look what
it can do to your Lumbar/Pelvic/Hip complex if you let it.
I consider posture the foundation that determines how
your body moves. Since my primary focus as a personal trainer is improving the
mobility of my clients, we spend a lot of time on posture exercises.
How do I begin having my clients work on this region of
their posture?
Since no one region of our spine works alone, the neck
exercises from part 1 and the shoulder/thoracic spine exercises from part 2
help with this.
Once the neck/shoulder/thoracic spine exercises are done
we move onto the Lumbar/Pelvic/Hip Complex Movements.
_____________________________________________________________
Since the focus in part 3 is on the lower portion of the
torso, a lot of older adults can have something called Lower Crossed Syndrome.
 |
| http://www.nickcurrydc.com/ |
_______________________________________________________________
Another posture I run into sometimes is called the Flat Back Posture.
 | |||
| http://tangobreath.com/tango-cross-training-lumbar-spine-and-posture/ |
I have had much success having clients stand with their backs against a wall so I can analyze what type of posture they have. This gives me an idea on where to begin teaching them how to improve their posture. The Spinal Straightening/Stabilization Technique below is a great tool for this.
___________________________________________________________
WHEN WORKING ON ANY EXERCISE INVOLVING YOUR SPINE, NEVER
FORCE YOUR BODY INTO A POSITION. The focus should always be on how you are
controlling the muscles and joints and the movements they are making. The pace
of each movement should be slow. Perform from 5 to 10 reps of each. The goal is
to get the muscles turned on as opposed to tiring them out. If you feel fatigue
in the muscle when you are done, you have done too many.
What exercises you perform are important. How you perform
them is more important.
Before attempting any of the following exercises, be sure
to get the approval of your Physician. Especially if you have ever had back or
hip pain, or a back or hip injury. If
you aren’t sure how to perform any of these exercises, have someone show you
that knows how to teach you.
After evaluating that a new client should and can work on
their Lumbar/Pelvic/Hip stability and mobility, I begin teaching each client
the following:
The first area I have them work on is something called
the neutral spine. Years ago I read an article that taught me how to teach
clients how to properly lengthen their spines from a standing position. Even
though the author wrote if for power lifters, I feel it works great for anyone
concerned about their posture.
____________________________________________________________
A
Very Effective Spinal Straightening/Stabilization Technique
“Both before and after deadlift execution and as part of
the daily stretching/strengthening routine, the following technique should be
considered as part of any normal stretching or posture improving and
strengthening routine. This particular movement performed with back against the
wall was originally described to me by my German born-grandfather as advised by
his osteopath. Needless to say both he and my grandmother practiced this
movement daily and had perfect posture right up to age 100, which is why I took
notice.
Of course, Pavel tried it and loved it as a matter of his
extended spinal therapies (even though a German
not a Russian ? is on record for this movement's origination). Since a
lot of people feel that at times their back is up against the wall, I named
this movement, the "Up Against the Wall" SSST or
Spinal/Straightening/Stabilization Technique.
Step 1 Back up
into a wall or door so that the heels, buttocks, low middle back to C7/T12
(most upper back) and back of head (held level) make contact with surface along
with the back of the fully supinated hands/arms, elbows triceps and rear
lateral delts, in a down position with hands at hip level as if in the
beginning of a power curl.
Step 2 Breathe in
as you squeeze your contact points of heels, spine and back of head against the
wall, as you slowly raise the arms out laterally while sliding the back of the
hands/elbows/triceps against the wall to a 90 position at the shoulder and
elbow (as if in a "hold up" with a gun to your belly).
Step 3 Exhale,
then inhale again, push your body contact points (heels, buttocks, mid upper
back, scapulae/rear deltoids, head, elbows, back of wrists, triceps) against
the wall and then raise your arms overhead further to the point where you can
touch the thumb tips directly distal to your head in an arm extended position
(as if extending in a water-dive). Hold this position and inhale and exhale
from the diaphragm at least three times and hold the breath each time for a
count of five while pressing the body deeper into the wall.
This
is not as easy as it looks and you will discover that in fact not only will you
feel straighter and taller as a result of performing this "up against the
wall" exercise but you will be warmed up for any type of spinal extension
to follow."
I have found that better mobility and stability here
leads to not only improved posture, but also better working hips.” Who wouldn’t want improved posture and better
working hips? I know that I do.
A wrinkle I came up with is to have my clients stand
backed up to a door frame instead of a wall. This gives the arms a lot more
range of motion, which allows me to teach them how to move their arms while
keeping their spines stable. I might have them hold their arms in the prisoner
of war pose or extend them overhead. I might have them move their arms through
various positions while holding the torso rigid. To increase their ability to
hold this position, I might have them hold it for up to 2 minutes.
____________________________________________________________
My next goal is to teach the clients how to properly use their Glutes to stabilize the pelvis.
The first exercise I teach them is called the Standing Glute Squeeze. One of the greatest things about Glute sets is they can be performed just about anywhere. Once the clients understands what this should feel like they can also do them while standing, sitting in their chairs or car. Imagine, you can improve your posture while watching TV.
 | ||
| Glute squeezes can be done almost anywhere. |
Stand straight. Squeeze the Glutes together like you are trying to hold a quarter between the cheeks. Work on being able to hold the contraction for up to 30 seconds.
Once the clients has mastered this I might add Glute Bridging exercise to their routine if they are able to get up from the floor.
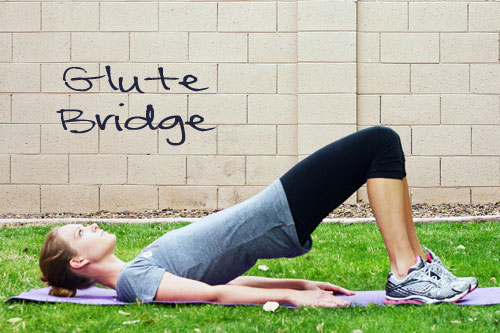 |
| http://inspiredrd.com/2010/03/glute-bridge.html |
The key to any bridging exercise to to make sure you use the Glutes to do the work, not the lower back. there are many variations that can be taught once the basic version is learned.
_______________________________________________________________
Next I teach my clients how to perform a 2 legged hip
hinge. The main goal here is to learn how to control your torso while leaning
forward from the hips. I make sure the clients focus on how they use their
hamstrings and glutes to control the movement.
Since Dan John does such a great job explaining this
movement, I will let him show you. He even shows how to teach a single legged
version. He calls it the Hinge Assessment Tool. (H.A.T.)
The key points are to focus on the hips and how they move
backwards and forwards. You should only move them as far as you can while
keeping the spine in neutral. I usually tell my clients to squeeze the shoulder
blades together since this helps keep the lumbar spine straight. Done properly
the weight shifts from the toes to the heels as the hips move backwards. With
enough control the toes can even come off the ground.
Once my client has mastered the hip hinge, I usually
teach them how to perform a single leg hip hinge. This increases the challenge since
it is harder to balance on one leg.
___________________________________________________________
After the hip hinge we move onto squatting. While most
people consider squats a strength exercise, I consider if useful for a lot more
than that. IMO, Squats can also be a posture exercise and a mobility exercise.
The key to a great squat is being able to hold the torso in a neutral position while the
hips, knees and ankles bend. This is the main reason I want my clients to have
control of their torso before learning how to squat. (and before most exercises
I teach them)
 |
| http://www.precisionnutrition.com/all-about-the-squat |
Depending on the ability of the client, I might have them begin squatting while holding onto something in front of them like a chair or counter top. See how the chair is being used in the pic below.
 |
| http://www.nhs.uk/Livewell/fitness/Pages/strength-exercises-for-older-people.aspx |
Once they gain enough strength and balance while using their hands, I will have them practice their squats from the chair. I will go into more details about squatting in a future post about building strength and mobility by squatting.
Imagine trying to squat while holding your hands in the
prisoner of war position. Once you can do this, keeping your shoulders up while
squatting becomes easier.
_________________________________________________________________
The next exercise involving the Lumbar/Pelvic/Hip Complex
I teach my clients is a split squat. Not all my clients are ready to perform
them. Once they have shown me enough control of their torso, I will think about adding this to their routine.
 |
| I make sure the chair doesn't have wheels. http://www.newyou.com.ph/five-minute-office-chair-workouts |
I will have most of my clients
learn this while holding onto something sturdy like a counter top or
chair with the hand closest to the trail leg.
The goal it to get what is called a 90-90 position at the bottom. What is meant by this is to get a 90 degree bend at the knee and at the hip. This is repeated facing the opposite direction with the legs in the opposite positions.
Once they develop enough control we start relying less and less on the hand and more on the legs. Since this is tougher than squats, I might start a client on only 1 or 2 reps per side. Once a client can perform 5 - 6 reps on each side, I will have them begin working on holding the bottom position for longer periods of time. (10 -15 seconds)
 |
| http://fitbottomedgirls.com/2013/06/the-3-best-butt-exercises/ |
Having the hands on the hips is a lot easier than the Prisoner of War version.
 |
| Prisoner of War Version: http://www.strengthcoach.com/public/viewimage.cfm?imgid=2123 |
The key to Stationary Split Squats is keeping the torso as vertical as you can
while your hips lower towards the floor. My main goal is to increase the depth
that my clients can drop their hips as they gain experience. This will increase
the range of motion in their hips. The greater this range, the easier movements
are on the lower back.
_______________________________________________________________
The last exercise I teach some of my clients is a lateral squat.
 | ||
| My Mentor Mike Boyle showing how it is done. |
The goal here is to increase the range of motion that the clients hips can move from side to side.
They might have to begin while holding onto something like a chair or counter top in front of them. It is all about increasing how well the client can move those hips in
various planes of motion. As always, the client focuses on keeping the
torso as stable as they can. I might even add some rotational movements to the hips and torso as the client progresses.
____________________________________________________________________
I hope you have enjoyed my 3 post on posture while you learned a few things in the process.
Next week I will go into more details on how I begin to move my clients from posture to dynamic mobility exercises.
2 comments:
Not a bad article. However when concerning lumbar stability and mobilisation, it does depend obviously on age, sex and current posture. Some exsersizes are not suitable for some clients. You'd certainly not take an older client into deep squats in any format. When stabilising the glutes to aide stability to the core and hip mobility as well as balance, the reference to squeezing them to me is exactly the opposite of what you want to mobilise the legs and disassociate the hips from the hip socket so hips move freely with control from the core and glutes. Sqeezing the glutes would actually limit movement. Glute mead needs to be trained for stability at the hips. But that's not to say they require squeezing to obtain their appropriate activation. This squeezing Leeds to the worsening of posture as you now have a group of people actually ticking their pelvis under to squeeze the glutes. These people aren't going to feel better any time soon. When encouraging pelvic floor and traverse abdominal activation in order to assist in stabilising the lower back and lower extremeties. The main thing you don't want is a client squeezing their glutes. You'll see they find it impossible to engage their core and pelvic floor while they're squeezing their glutes. Yes glutes do have a significant role in supporting the hips and aiding balance. This definitely doesn't happen be teaching a client to squeeze their glutes. These muscles are easily isolated with excersises and trained to aide stability and disassociation at the hip but. Certainly not be cueing clients to squeeze their glutes. This is a sure fire way to aide incontinence issues by misusing the glutes as the main stabiliser of the hips. Unfortunately with out proper pelvic floor control and the recruitment of the core muscles for stabilisation along with glute mead strengthening stabilisation will start heading Dow. Hill instead of up.
Everything depends on the current capabilities of the client. I am giving examples.
Maybe I don't make myself clear enough. If people would work on a lot of these things before they reach their 40's, they won't lose their mobility like most people do.
Yes, I am a believer in focusing on training the glutes for stability. If you continue reading parts 4 and 5 you will see examples of hip mobility and stability exercises.
Post a Comment