In case you missed the first 3 posts:
 |
| Mike Boyle working on Hip Stability and Mobility |
What you will
find is we will use some of the same exercises for improving posture, mobility
and strength. The difference is how the exercises are performed.
In part 1 of my posture
series the main focus was on posture while also working on the mobility and stability of the head and neck at the same time.
In part 2 we
focused on posture while also working on the mobility and stability of the shoulders and thoracic spine at the same time.
In part 3 we
focused on posture while also working on the mobility and stability of the Lumbar/Pelvic/Hip Complex at the same time.
Why do I begin
with posture and mobility before strength? I want my clients to maximize the gains, while minimizing the
risks they will make from the complex movements I use to
make them stronger. The results will be much better if they can stabilize what
I want stable and move with control what I want mobile.
WHEN
WORKING ON ANY OF THESE EXERCISES, NEVER FORCE YOUR BODY INTO A POSITION. The focus should always
be on how you are controlling the muscles and joints and the movements they are
making. The pace of each movement should be slow. Perform from 5 to 10 reps of
each. The goal is to get the muscles turned on as opposed to tiring them out.
If you feel fatigue in the muscle when you are done, you have done too many.
What exercises
you perform are important. How you perform them is more important.
Before attempting
any of the following exercises, be sure to get the approval of your Physician.
Especially if you have ever had ANY JOINT OR BACK PAIN or INJURY. If you aren’t sure how to perform any of
these exercises, have someone show you that knows how to teach you.
To begin their warm
up, I will have them go through the posture exercises focusing on their techniques. Once I know they are using their posture exercises on their own we move onto the mobility exercises. Some of these mobility exercises
can also be considered balance exercises depending on how they are performed.
(How much they are using their hands for balance)
We begin with
what are called dynamic warm up exercises. Dynamic
exercises involve using the muscles to move joints through various ranges of
motion. The goal here is to warm the muscles and joints up so their bodies are
ready for the balance and strength exercises that will follow. This is opposed
to static stretching which have been shown to decrease the amount that the
muscles being stretched can contract immediately after the stretch. This is the
exact opposite of what I want for my client’s warm up.
Since the upper
body posture exercises are also mobility exercises we have this part of the
body covered for dynamic warm up. Now it is time to move to the lower body.
_____________________________________________________________
Hip Mobility and Dynamic
Warm UP:
_____________________________________________
 |
| It looks something like this except the feet are kept around hip width apart so that the femurs rotate. https://www.dads.state.tx.us/texercise/resources/handbook/english/strength.html |
The first
mobility exercise taught is: External and Internal Hip Rotation.
First I have the
client sit on the edge of a chair with their knees around hip width apart and bent
around 90 degrees.
I teach them how
to gently externally
and internally rotate their femurs
from their hips. (Bring the knees farther apart and closer together using the muscles
around their hips.) I look to see if there are any major differences between
each him, femur, knee and ankle. If one side has a much greater range of
motion, we work on that side more if possible. Is the clients spends a lot of
time sitting down, it will probably be easier for them to externally rotate and
internally. We will have them focus more on the internal rotation. I might have
them hold the internal rotation for a count of 10 – 15 seconds. And repeat this
hold for 3 – 5 reps.
This external and internal rotation pays off when teaching
client’s how to increase the depth of their squatting when we are working on
them for mobility and strength building.
______________________________________________________________
 |
| Hip Flexion with knee bent http://www.happyfitme.com/womens-workout-preview/?workout_view2094 |
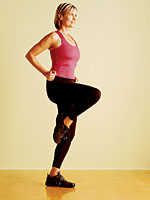
Next we move
onto Hip Flexion with Knee Bent
I begin with the
client stand while holding onto a counter top so they can focus on feeling the
muscles contract.
First we begin with Knee
Raises. The goal is to be able to raise the knees to above hip level without
the shoulders or lumbar spine moving.
Weight on the
left leg and their right hand on the counter top for balance
Lift your right
knee up using hip muscles, pause at top, feel hip muscles contract.
Slowly lower
right knee back down. Repeat until hip muscles begin to feel tired.
Turn to face the
opposite direction.
Weight is on the right
leg and the left hand on the counter top for balance.
Using left hip
muscles to lift left knee until left hip muscles begin to feel tired.
_______________________________________________________________
 |
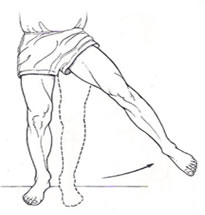
| Standing Hip Extension http://b-reddy.org/2013/07/29/better-exercises-to-stretch-the-hamstrings/ |
Next we move to Hip Extension. The focus is on how the glutes are used for hip extension. The goal is to be able
to raise the leg backwards without the shoulders or lumbar spine moving.
One of the keys to this movement is
making sure the client only moves the leg backwards using the muscles in that glute
and stopping before the lumbar spine extends.
Weight is on the
left leg and the right hand on the counter top for balance.
Squeeze right
glute while moving leg backwards and keeping the knee almost straight. Repeat
until right glute begins to feel tired.
Turn to face the
opposite direction.
Weight on the
right leg and the left hand on the counter top for balance.
Repeat with the
left glute muscles.
_____________________________________________________________
 |
| Standing Hip Abduction http://www.lifescript.com/diet-fitness/workouts/5_exercises_for_strong_bones/standing_hip_abduction.aspx |
 |
| Standing Hip Adduction http://www.forrestfitness.com/2013/10/23/tighten-your-glutes-in-15-minutes/ |
Next we begin working on
lateral (side to side) hip mobility. (and Hip abduction and Adduction)
Side Leg Raises –
I have them face the counter top.
Weight is on the
right leg and the hands are on the counter top for balance
Lift left leg
sideways using muscles on side of left hip while keeping shoulders still.
Lower the leg down until it crosses in front of the right leg while keeping the shoulders still. Repeat until left hip begins to feel tired.
Lift right leg
using muscles on side of right hip while keeping shoulders still. Lower the leg down until it crosses in front of the left leg while keeping the shoulders still. Repeat
until right hip
begins to feel tired.
_________________________________________________________________
Once I am
satisfied that the client is performing these while holding onto the counter top I
teach them how to perform them while moving. This makes them more challenging
for their balance.
The pace of
movements can move from SLOW - MODERATE – FAST. Slower is more challenging
to their strength levels and faster is more challenging to their balance
levels.
____________________________________________________________
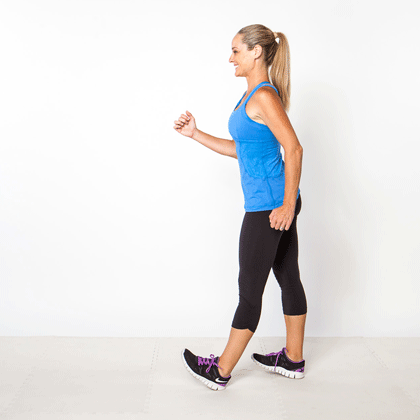
 |
| Forward Marching http://www.health.com/health/article/0,,20410610,00.html |
Forward Marching: Imagine Standing Hip Flexion while moving forward.
March forward
slowly for 15 - 20 feet alternating raising each knee up as high as
comfortable. I make sure they keep their torso as tall and still as possible.
This is why I teach the Very Effective Spinal Straightening/Stabilization Technique before having them marching.
_________________________________________________________________
Sideways Marching:
Next I have them march sideways slowly for 15 - 20
feet in each direction while alternating raising each knee as high as
comfortable. Imaging stepping over something fairly tall from the side. I make
sure they keep their torso as tall and still as possible. The focus is on moving/rotating
from the hips.
 |
| Imagine this while standing up straight http://bigstory.ap.org/article/jones-steps-sideways-ravens-march-forward |
Forward Internal Hip
Rotation with Flexion:
Next if I feel
that they need it and can do it, I have them perform a forward walking exercise
while alternately internally rotating and flexing their femurs for 15 – 20 feet.
I make sure they keep their torso as tall and still as possible. They focus on
feeling their inner thigh and groin muscles contracting while the outside of
their hips/glutes stretch.
______________________________________________________________
 |
| Imagine moving sideways while lifting you leg to the side. http://www.drmavalankar.com/imp-total-knee-replacement.php |
Sideways Hip Abduction:
The next movement
I add is hip adduction while walking sideways. They use their hip muscles to
pick their lead leg up to the side in the direction they are moving for 15 -20
feet. They repeat this in the opposite direction. I make sure they keep their
torso as tall and still as possible. The goal is to activate the hip abductor muscles, not kick the
foot as high as possible.
________________________________________________________________
 |
| Imagine moving forward while doing this http://learning.summitrehab.ca/Injuries-Conditions/Knee/Exercises/Standing-hamstring-curls/a~1082/article.html |
Walking Knee Flexion:
Another movement
I might add is alternately lifting the heels up towards the glutes while walking
for 15 – 20 feet. They focus on how the hamstrings are contracting and the
knees are stretching.
I make sure they keep their torso as tall and still as possible.
I make sure they keep their torso as tall and still as possible.
_________________________________________________________________
Dynamic Ankle warm ups:
________________________________________________________________
Next we move to exercises
to warm up the ankles: Planterflexion and Dorsiflexion.
 |
| Ankle Pumps http://www.borgess.com/default.aspx?pId=2150 |
Seated Ankle Extension
and Flexion: aka Ankle Pumps
I have the client
sit in a chair with their legs out straight with the heels on the floor.
I have them alternate
extending each foot like flooring a gas petal in a car. (Plantar flexion) and
then alternate having them bring their toes as close to their shins as they
can. (dorsiflexion) I have them hold this dorsiflexion for a count of 5 – 10 so
they can really feel the shin muscles contracting. This also improves the
mobility of the heel cord. (aka the Achilles’ tendon)
________________________________________________________________
 |
| Ankle Rotations http://www.flowyogamagazine.com/2012/06/13/stress-management-through-yoga-a-daily-home-practice-by-soham-bose/ankle-rotations/ |
Seated Ankle Rotations:
I have the client
sit in a chair with their legs out straight with the heels on the floor. They
practice rotating each foot in one direction and then the opposite direction. I
have them repeat each direction 5 – 10 times.
Once I feel that
the client is ready, I add the following standing ankle exercises.
________________________________________________________________
 |
| Start with raising the toes and in one movement https://www.dads.state.tx.us/texercise/resources/handbook/english/strength.html |
 |
| And then do this in one smooth movement http://www.northeastfootandanklesurgery.co.uk/exercises/ankle-exercises |
Stationary Heel and Toe
Raises:
The client
stands up straight while holding onto their counter top in front of them. Using
their shin muscles, they slowly raise up their toes as their weight shifts
towards their heels. They slowly shift their weight forward on their feet until
they are standing on the balls of their feet. They alternate this weight
shifting for 5 – 10 reps. This is also a great balance exercise. They focus on
keeping their hip, torso, shoulder and head movements to a minimum.
Once the client
has enough control of this movement we move onto more dynamic versions.
________________________________________________________________
Standing Ankle Flexion
and Extension:
_________________________________________________________________
 |
| Keep those heels up http://livingafitlife.tumblr.com/post/36215939762/shin-splints-the-very-words-strike-fear-into-the |
Forward Heel Walking:
(ankle flexion)
They walk forwards
slowly on their heels for 15 – 20 feet, with their feet pointed straight ahead while
their toes are held as close to their shins as they can hold them. Their legs
should be relatively straight as they walk. They focus on keeping the shin muscles
contracted the whole time they are moving.
_________________________________________________________________
 |
| Now do it while moving sideways http://runnersfeed.com/category/training/running-drills-training/ |
Sideways Heel Walking:
(ankle flexion)
They walk sideways
slowly on their heels for 15 – 20 feet, with their feet pointed straight ahead
while their toes are held as close to their shins as they can hold them. Their
legs should be relatively straight as they walk. They repeat this in the
opposite direction. They focus on keeping the shin muscles contracted the whole time they
are moving.
_____________________________________________________
 |
| Imagine doing this while doing big steps forward http://www.focusonmexico.com/Painful-Feet.html |
Forward Toe Walking:
(ankle extension)
They concentrate
on putting as much weight as possible on their big toes whenever walking on the
ball of the foot.)
They walk forward
slowly on your toes with their legs straight and feet pointed straight ahead,
pausing with each step for 15 - 20 feet. The forward steps can be fairly large.
Next they walk
forward quickly on their toes with their toes pointed straight ahead for about
20 feet, getting as high up on their toes as they can. This time the steps
should be very small.
_______________________________________________________________
 |
| Do this while standing on your toes http://www.nhs.uk/Livewell/fitness/Pages/balance-exercises-for-older-people.aspx |
Sideways Toe Walking:
(ankle extension)
They concentrate
on putting as much weight as possible on their big toes whenever walking on the
ball of the foot.)
They walk sideways
slowly on your toes with their legs straight and feet pointed straight ahead,
pausing with each step for 15 - 20 feet. They repeat this in the opposite
direction.
This covers most
of the mobility exercises I use with my clients.
Next week’s
post will be about the dynamic and static balance exercises I add to my clients
programs once they have enough control of their basic movements.