In case you missed it here’s Part 1 (Your Neck and Head))
Today’s topic (Part 2: Shoulders and Thoracic Spine) is
the second post dealing with the area that can change the most, our posture.
What changes in our posture during the decades from reaching adulthood until
retirement?
I believe that all training should begin by improving a client’s
posture before working on more complex things like mobility and strength. Bad
posture with a lack of mobility and stability can lead to injury.
When I mention posture do you think of your body being
held in a rigid and static position? After reading my blog posts about this, I
hope your picture of posture will change. While it is important to be able to
put your body into a certain position, posture can be thought of as more
dynamic than that.
What causes changes in posture? Whatever position(s) we
spend the most time in has a huge effect on posture. An example is sitting down
watching TV or working on a computer or tablet. Gravity never rest. Look what it can do to your thoracic vertebrae if you let it.
 |
| http://www.bodycare-clinic.co.uk/questions-from-patients-1/ |
I consider posture the foundation that determines how
your body moves. Since my primary focus as a personal trainer is improving the
mobility of my clients, we spend a lot of time on posture exercises.
 |
| The position of the thumbs is a dead giveaway that someone could use some work to improve their posture http://www.builtlean.com/2011/11/28/posture-problems/ |
Now let’s focus on the Shoulders and Thoracic Vertebrae
 |
| http://intellectualfitness.org/?attachment_id=386 |
When we spend too much time leaning forwards towards whatever is in
front of us it can lead to something called Upper Body Crossed Syndrome. Think
about how gravity is pulling the body down from this posture. It can also be considered having your thoracic spine flexed or shortened too much.
Next time you are around a lot of senior citizens look to see how many have some degree of hunchback in their spines. You can find them everywhere.
 |
| http://www.builtlean.com/2011/11/28/posture-problems/ |
Another thing that can have quite an impact on posture
can be your hobbies. In some ways Golfers and Cyclist bodies adapt the same way
(Look at how much they time they each spend in thoracic flexion)
 |
| http://www.bobbyeldridgegolf.com/swing-setup-address-golf-ball/ |
 |
| http://www.smh.com.au/nsw/cyclists-say-missing-links-are-a-spoke-in-the-wheel-20110503-1e6u8.html |
Being able to flex from the thoracic spine can be a good
thing since it helps during these activities. The problem is we should not be flexing
much from here when we are not participating in them. One of the many reasons
is the effect this flexing has on our spines. Who wants to become shorter as
they get older? Not me.
How do I begin having my clients work on this region of
their posture?
Since no one region of our spine works alone, the neck
exercises from part 1 help with this.
Once the neck exercises are done we move onto Shoulder
Movements.
WHEN WORKING ON ANY EXERCISE INVOLVING YOUR
SPINE, NEVER FORCE YOUR BODY INTO A POSITION. The focus should
always be on how you are controlling the muscles and joints and the movements
they are making. The pace of each movement should be slow. Perform from 5 to 10
reps of each. The goal is to get the muscles turned on as opposed to tiring
them out. If you feel fatigue in the muscle when you are done, you have done
too many.
What exercises you perform are important. How you perform
them is more important.
Before attempting any of the following exercises be sure
to get the approval of your Physician. Especially if you have ever had shoulder
or back pain, or a shoulder or back injury. If you aren’t sure how to perform
any of these exercises, have someone show you that knows how to teach others.
After evaluating that a new client should and can work on
their shoulder and thoracic mobility, I begin teaching each client the
following: (Since it is easier to focus on what I want them to learn, I usually
begin with my client in a seated position and move to a standing position as
soon as I feel they are ready. The standing position takes more balance and
control of the torso.
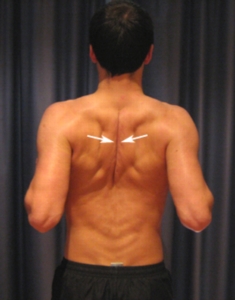
The first area I have them work on is their shoulder
blades. I have found that better mobility and stability here leads to not only improved
posture, but also better working shoulders.
_____________________________________________________________
Shoulder Blade/ Thoracic Spine Movements:
 |
| http://theartofads.blogspot.com/2010/01/lie-to-me-109.html |
Shrugs:
Raise or shrug your shoulders towards your ears, take them
backwards and down in a smooth action.
__________________________________________________________
 |
| http://www.muscularinjuryspecialist.com/pain-between-the-shoulder-blades.html |
Shoulder Blade Squeezes:
Squeeze Shoulder blades together long enough to really
feel the muscles contract. Feel where the muscles being contracted attach to
the spine. Arms can be held in various positions. I usually have clients begin
with their elbows bent with the hands around elbow height. Move shoulder blades
forward to starting position. Repeat 5 – 10 times. Once this is mastered I
can have them perform them with their arms straighter or with the palms facing
upward. I will put my fingers on the client’s middle back where I want them to
focus on. This contact helps improve the clients focus on what I want them to
feel.
Alternate
bringing each shoulder blade back. Hold each back long enough to really feel
the contraction around the shoulder blade. Feel how these muscles affect the thoracic
spine. Repeat 5 – 10 times. Once again I will put my fingers on the client’s
middle back where I want them to focus on. This contact helps improve the
clients focus on what I want them to feel.
Once I feel that the client has enough mobility and
stability in the shoulder blades we move onto getting the arms involved.
___________________________________________
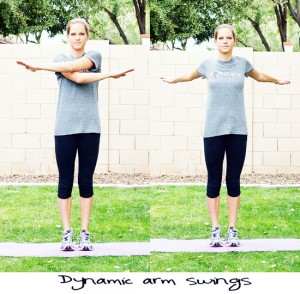
Dynamic Arm Movements: (It is easier to get a better range of
motion if the client is standing while working on these.)
I will manually help the clients move their arm for them if there is a reason they aren’t ready to do it
by themselves. The goal is to get them to be able to do the movements by themselves.
Stand tall,
feet slightly wider than shoulder-width apart, knees slightly bent
Keep the back
straight at all times
Remember: The focus should always be on how you are controlling
the muscles and joints and the movements they are making. If the arms are swung
too quickly, it is harder to focus on the movements.
 |
| http://inspiredrd.com/2010/03/dynamic-arm-swings.html/dynamic_arm_swings-2 |
Forwards and Backwards
Stick the chest out. With arms around shoulder height, slowly brings arms backwards and then forwards in front of the chest. Focus on how the shoulder blades are moving
with the arms. Focus on the muscles that
are moving the arms. Repeat 5 – 10 times.
_____________________________________________________________
| http://www.runningatom.com/2010/02/unilab-running-clinic-day-1.html |
Overhead/Down
and back
Slowly raise both arms continuously
to an overhead position and then forward, down, and backwards. Focus on how the
shoulder blades are moving with the arms. Repeat 5 – 10 times.
____________________________________________________________
 |
| http://www.leehayward.com/rotator_cuff.htm |
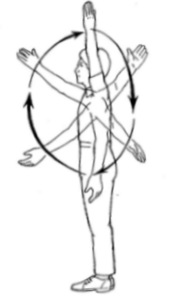
Arm circles:
Stick the chest out. Start with very small circles. Slowly
move the arms in a forward circular motion. Focus on how the shoulder blades
are moving with the arms. Repeat for 5 to 10 reps. Slowly move the arms in a rearward circular
motion. Repeat for 5 – 10 reps. The goal is to increase the range of motion/size
of the circles over time.
______________________________________________________________________
______________________________________________________________________
I copied the Crucifix Stretch from:
http://bretcontreras.com/5-things-you-should-do-everyday/
 |
Crucifix Stretch
Quoting Brent:
"Why it’s a good idea: Our society has become increasingly sedentary over the years, and this sedentarism is not so good for low back pain and function (29). And all the prolonged sitting we do is generally not very good for back pain either (30-31). The typical desk-worker is slumped over with a rounded spine and rounded shoulders, along with a forward head position. We want to “undo” this posture by stretching the shortened muscles and strengthening the lengthened muscles. Rest assured, the crucifix stretch achieves both of these criteria.
What to do:
Stand tall and place the arms out to the sides. Simultaneously extend the spine by picking the chest up and externally rotating the shoulders by pointing the thumbs behind you. Keep the head and neck in a neutral or packed position (which resembles a double-chin). Hold this position for 3 seconds and repeat 5-10 times."
Once a client has this version mastered we add the following:
____________________________________________________
Alternating Shoulder Blade Retractions:
Alternating Shoulder Blade Retractions:
Hold arms straight out in front of your body with the
palms facing each other or up, around shoulder height. Stick the chest out. Slowly
bring one arm back while keeping that elbow straight. Focus on using the
shoulder blade to perform the movement. Slowly bring that arm back to the
starting position. Repeat with the other arm. Repeat 5 – 10 times on each side. Focus on how
the thoracic spine is affected as the shoulder blades move backwards.
______________________________________________________________
 |
| Image these without resistance. http://nicktumminello.com/2014/03/face-pulls-grip-tip-and-top-2-variations/ |
Face Pulls: Not all clients get to use this one. I have to be sure they can handle
it since it can be very challenging for the shoulders. Certain shoulder conditions
will keep me from having a client use this exercise.
Stand tall with both arms straight in front of your torso with the palms down. Pull both hands back with the thumbs close to the ears. Focus on how the shoulder blades are moving and how the muscles around them feel. Hold the hands in the back position for a count of 5. Bring hands back to starting position. Repeat 5 - 10 times. This can also be done in an alternating fashion.
_______________________________________________________________
 |
| He decided to squat while in the prisoner of war position |
Prisoner of War Pose: Like Face Pulls, not all clients get to use this one. I have to be sure they can handle
it since it can be very challenging for the shoulders. Certain shoulder conditions
will keep me from having a client use this exercise.
Place both hands behind the head. The wider the hands are the easier. Work on being able to eventually interlock the fingers. Stick the chest out.
Slowly move the shoulder blades back as far as you can without too much uncomfortableness.
Hold for a count of 10 - 15 while focusing on how the shoulder blades are being
affected by this. Focus on how the thoracic spine is extending or lengthening. Relax the elbows. Repeat 2 - 3 times.
 | |
| Yes they can be done while seated.http://www.alive.com/articles/view/23501/improve_your_posture |
_____________________________________________________________
Since Mike is such a great mentor, I will let him perform them while on his bottom.
Prisoner
War Pose with rotation:
Place both hands behind the head. Stick the chest out.
Slowly move the shoulder blades back as far as you can without too much
uncomfortableness. Slowly move one elbow back while keeping the other elbow
still. Keep the torso and hips as still as possible. Hold the elbow back for a
count of 5 – 10 while focusing on how the shoulder blade is being affected by
this. Focus on how the thoracic spine is affected by this. Bring that elbow
forward and repeat with the other elbow. Repeat 5 - 10 times.
_____________________________________________________________
 |
| http://www.alive.com/articles/view/23501/improve_your_posture |
Scapular Wall slides: Like Face Pulls and Prisoner of War Poses, not all clients get to use this one. I have to be sure they can handle
it since it can be very challenging for the shoulders. Certain shoulder conditions
will keep me from having a client use this exercise.
Stand with your back against a wall. Keep your rear end, back and head against a wall. Keep the normal curves in your spine. Place your elbows on the wall so that they are around the height of your shoulders. Press both arms into the wall with the palms of your hands
facing forward. Lower your elbows until they are close to your sides. Hold the bottom position for a count of 10 - 15. Feel the tension build in the muscles that are holding your shoulder blades down. Next raise your arms slowly
upward against the wall as high as you can without your hands and elbows losing touch with the wall. Keep your rear end, back, shoulder blades, head, elbows and
the backs of your hands pressed against the wall the whole time. Now
slowly return to the start position. Repeat this movement 5 - 10 times.
The goal is to increase how low and close to the body the elbows can go.
______________________________________________________________________
That covers the dynamic exercises I like to use to improve my clients posture when it comes to their shoulders and thoracic spine.
Performing these exercises a few times (3 - 5) per week before you have the Upper Cross Syndrome or a Hunchback will make it easier to avoid ever getting either.
Another one of my goals with these exercises is to get my clients to be able to get as close to the good posture test as they can.
 |
| http://www.crossoversymmetry.com/iron_scap.php |
 |
| http://www.crossoversymmetry.com/iron_scap.php |
Why having
the proper teacher can make a difference when it comes to these movements:
There are always tweaks that can be made to these movements
depending on the client’s abilities. This is where the art of training can be
more important than the science of it. It takes time to figure out what each client’s
needs and abilities are.
No matter what anyone says, it any of these exercises
make you feel worse or cause pain, than either they aren’t for you, are you
aren’t ready for them yet.
Resistance can be added to a lot of these movements once the client is ready for that. I make sure they know how to perform the movement with great technique first.
Next Week’s topic: Posture Part 3 (The Lumbar/Pelvic/Hip
Complex)
No comments:
Post a Comment